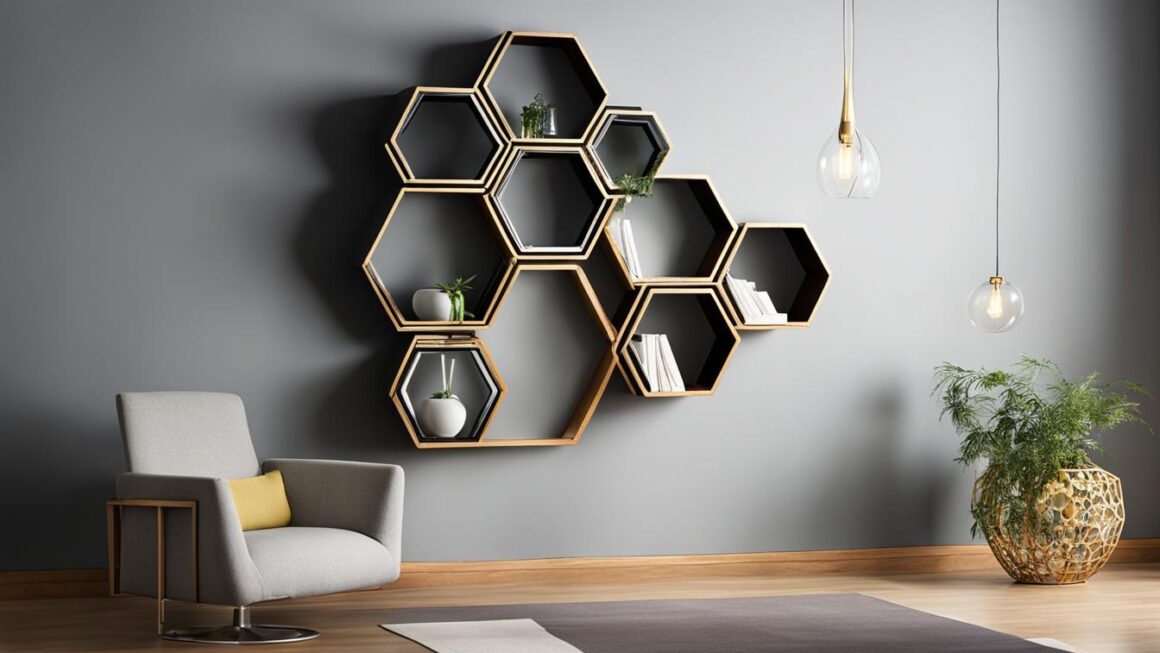
Create beautiful honeycomb shelves for your home with this simple DIY project. Follow the step-by-step instructions to make stylish and functional storage that will enhance your home decor.
Key Takeaways
- DIY honeycomb shelves are a great way to add both style and functionality to your living space.
- Using basic tools and materials, you can easily create unique and eye-catching honeycomb shelves.
- Make sure to measure and cut the wood accurately to ensure a perfect fit for your hexagon shelves.
- Assemble the hexagons using wood glue and screws, following the provided instructions.
- Once assembled, sand the edges of the shelves to create a smooth finish.
Supplies and Tools Needed
To create your own DIY honeycomb shelves, you will need a few essential supplies and tools. Make sure to gather these items before you begin your project to ensure a smooth and efficient process:
- Miter saw or chop saw
- Wood screws
- Drill and drill bit
- Level
- Rotary sander or sandpaper
- Wood glue
- Tape measure
- Wall brackets
- Pencil
- Fencing planks
Having these supplies and tools at hand will help you create sturdy and visually appealing honeycomb shelves for your home. The miter saw will allow you to make precise cuts, while the drill and drill bit will help you secure the pieces together. A level will ensure that your shelves are straight and properly aligned. Don’t forget to have wood glue, tape measure, and wall brackets for added stability. Lastly, fencing planks will be the main material for your honeycomb shelves.
With all these supplies and tools ready, you’ll be well-prepared to embark on your DIY honeycomb shelf project. Let’s move on to the next section to learn about cutting and preparing the wood.
| Supplies | Tools |
|---|---|
| Miter saw or chop saw | Drill and drill bit |
| Wood screws | Level |
| Rotary sander or sandpaper | Wood glue |
| Tape measure | Wall brackets |
| Pencil | Fencing planks |
Having the right supplies and tools will make your DIY honeycomb shelf project a breeze. It’s important to gather everything you need before starting to ensure a smooth workflow. From cutting and assembling to sanding and finishing, these supplies and tools will be your trusty companions throughout the process.
Cutting and Preparing the Wood
To create the honeycomb shelves, you will need to start by cutting and preparing the wood. Use a miter saw to cut the fencing planks at a 30-degree angle. Begin by removing the decorative end of the plank, then measure and cut each piece to 12 inches in length. It’s important to ensure that all the pieces are the exact same size and have angled cuts on both ends.
By cutting the wood in this way, you will be able to create the distinctive hexagonal shape that gives honeycomb shelves their unique and eye-catching design. The angled cuts allow the pieces to fit together seamlessly, forming a sturdy structure that can hold your belongings securely.
Before proceeding with the next steps, double-check that all the wood pieces are cut accurately and have the correct angles. This attention to detail will ensure that the honeycomb shelves come together perfectly and provide a visually appealing addition to your home decor.
Table: Wood Cutting Measurements
| Piece Number | Length (inches) |
|---|---|
| 1 | 12 |
| 2 | 12 |
| 3 | 12 |
| 4 | 12 |
| 5 | 12 |
| 6 | 12 |
| 7 | 12 |
| 8 | 12 |
| 9 | 12 |
| 10 | 12 |
| 11 | 12 |
| 12 | 12 |
| 13 | 12 |
| 14 | 12 |
| 15 | 12 |
Assembling the Hexagons
Now that you have prepared the wood pieces, it’s time to assemble the hexagons for your honeycomb shelves. The hexagons will be the building blocks of your stylish and functional storage. Follow these steps to ensure a sturdy and well-constructed shelf:
Step 1: Create the First Hexagon Pod
Start by gluing and screwing together six pieces of wood to form a hexagon shape. Apply wood glue to one side of a piece and attach it to another piece, making sure the angled cuts align perfectly. Pre-drill holes to prevent splitting and then insert screws to secure the pieces together. Repeat this process for each side until the first hexagon is complete.
Step 2: Add on to the Original Hexagon
To expand your honeycomb shelves, overlap the pieces of the original hexagon with the new pieces you want to add. Apply wood glue to the overlapping sections and use screws to secure them together. Repeat this process until you have achieved the desired size and shape for your shelves. The overlapping design ensures the structural integrity of the shelves while maintaining their unique hexagonal pattern.
Step 3: Ensure Stability
Once you have assembled all the hexagons, it’s essential to ensure the stability of your honeycomb shelves. Use a level to make sure the shelves are straight and aligned. Mark the positions on the wall where you want to hang the shelves and locate the studs using a stud finder. Screw the bottom part of the wall brackets into the studs to provide a strong foundation. Then, rest the shelves on the brackets and use a level to ensure they are straight. Mark the positions for the remaining brackets and screw them into the studs. Finally, reinforce the brackets by screwing them into the shelves themselves.
With the hexagons assembled and securely hung on the wall, your honeycomb shelves are now ready to be personalized and styled to complement your home decor.
Sanding and Finishing
Once the hexagons are assembled, it’s important to sand and finish the shelves to ensure a polished and professional look. Sanding not only smooths down the edges but also removes any splinters, creating a safe and comfortable surface to display your items. Whether you’re using pre-stained wood or planning to apply a finish, this step is essential for achieving the desired aesthetic.
Steps for Sanding and Finishing:
- Start by equipping yourself with a rotary sander or sandpaper. A rotary sander will save you time and effort, but if you don’t have one, sandpaper will work just fine.
- Thoroughly sand all the edges of the shelves, including the outside and inside of each hexagon. This will ensure a smooth surface and eliminate any rough spots. Take your time to ensure even sanding, paying attention to any corners or crevices.
- If you’re using pre-stained wood, sanding will give the shelves a worn and distressed look. However, if you prefer a more polished appearance, continue sanding until the wood feels silky-smooth.
- After sanding, wipe down the shelves with a clean cloth to remove any dust or debris. This will ensure a clean surface for applying a finish.
- If desired, apply a wood finish of your choice to protect the shelves and enhance their natural beauty. Options include clear varnish, stain, or paint. Follow the manufacturer’s instructions for application and drying times.
By sanding and finishing your honeycomb shelves, you’ll not only achieve a professional look but also protect the wood from damage and ensure its longevity. This step is crucial for creating a stunning and durable piece of decor that you can enjoy for years to come.

| Supplies | Description |
|---|---|
| Rotary sander or sandpaper | To smooth down the edges and remove splinters |
| Clean cloth | To wipe down the shelves after sanding |
| Wood finish | Optional, to protect the shelves and enhance their appearance |
Hanging the Shelves
Once you have completed assembling the honeycomb shelves, it’s time to hang them up and showcase your beautiful creation. Follow these simple steps to ensure a secure and level installation:
Step 1: Locate Studs
Before hanging the shelves, use a stud finder to locate the studs on the wall. This will ensure that the shelves are securely anchored to the wall and can support the weight of items placed on them.
Step 2: Install Wall Brackets
Screw the bottom part of the wall brackets into the studs. Make sure to use a level to ensure that the brackets are straight and aligned. This will ensure that your shelves are stable and won’t tilt or fall.
Step 3: Place the Shelves
Rest the assembled honeycomb shelves on the brackets. Use a level to ensure that the shelves are straight and level. This step is crucial to create a visually appealing display and prevent items from sliding off the shelves.
Step 4: Reinforce the Brackets
After confirming that the shelves are level, mark the position of the remaining brackets and screw them into the studs. This will provide additional support and ensure that the shelves are securely attached to the wall. Take care to reinforce the brackets by screwing them into the shelves as well.
With your honeycomb shelves securely hung on the wall, you can now enjoy the stylish and functional storage they provide. Personalize the shelves with your favorite decor items and create a visually appealing display that enhances your home decor.
Personalizing the Shelves
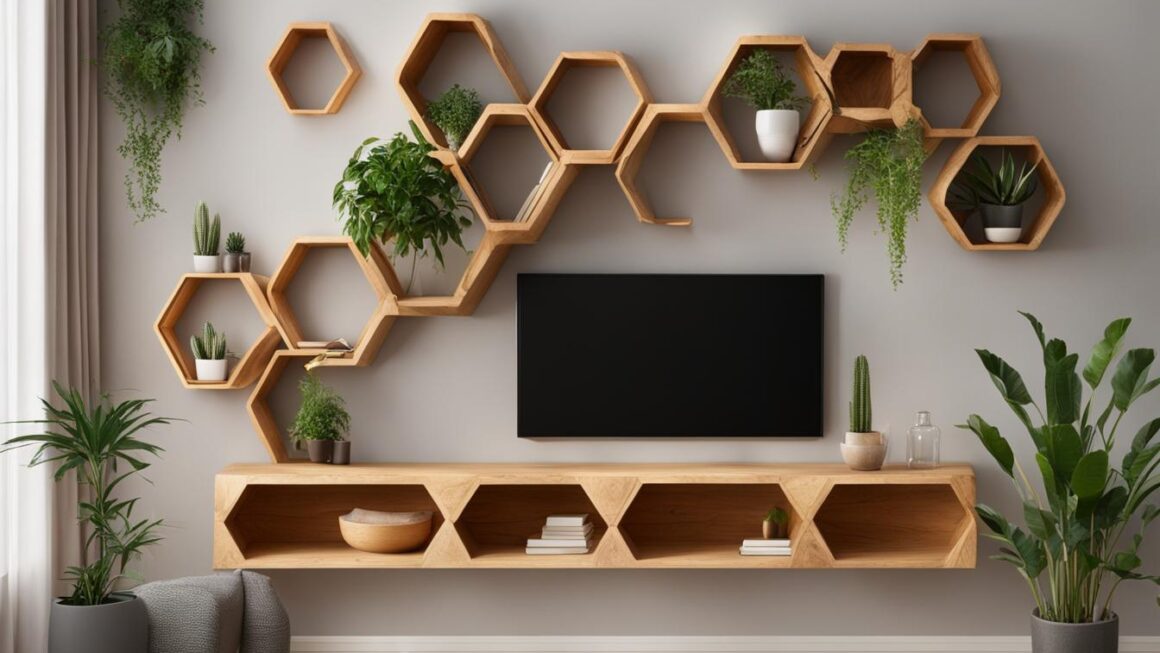
Add your personal touch to the honeycomb shelves by arranging and styling them with your favorite decor items. Use the shelves to display books, plants, or other decorative objects. Experiment with different layouts and accessories to create a unique and visually appealing display.
You can customize the look of your honeycomb shelves by adding a coat of paint or stain to match your home’s color scheme. Consider using bold colors for a statement piece or neutral tones for a more subtle and versatile look. Alternatively, you can leave the wood unfinished for a natural and rustic feel.
Accessorize your shelves with decorative objects that reflect your style and interests. Display family photos, artwork, or souvenirs from your travels. Add small plants or succulents to bring a touch of nature into your space. Mix and match different textures and materials for an eclectic and visually dynamic display.
Table: Examples of Shelf Styling Ideas
| Styling Idea | Description |
|---|---|
| Minimalist | Showcase a few carefully chosen items with clean lines and a limited color palette. Use white or neutral-colored decor and keep the arrangement simple and uncluttered. |
| Eclectic Mix | Combine various decor styles and objects to create an eclectic look. Mix vintage and modern items, different textures, and unexpected elements to create a visually interesting display. |
| Green Oasis | Transform your honeycomb shelves into a mini indoor garden. Add a variety of potted plants, hanging planters, and terrariums to create a lush and vibrant display. |
| Bookworm’s Delight | Showcase your favorite books in an artistic and visually appealing way. Arrange them in different orientations, stack them, and intersperse small decorative objects or bookends. |
| Seasonal Display | Change the look of your shelves throughout the year by incorporating seasonal decorations. Add holiday-themed decor, seasonal flowers, or ornaments to create a festive display. |
“The beauty of honeycomb shelves is that they can be personalized to suit any individual’s style and taste. Get creative and have fun experimenting with different arrangements and decor items to make your shelves truly unique!”
Alternative Options
If you’re not up for the challenge of creating DIY honeycomb shelves, don’t worry! There are alternative options available for purchase. Whether you’re looking for rustic charm or modern elegance, there is a wide range of honeycomb shelves from various makers and stores to choose from.
These ready-made honeycomb shelves offer the same stylish storage solution without the need for construction. With different designs and finishes available, you can find the perfect shelf to complement your home decor.
Additionally, these store-bought honeycomb shelves often come with easy installation instructions, making it even simpler to add this trendy storage solution to your space. Explore different styles and designs to find the honeycomb shelves that best suit your taste and home aesthetic.
While DIY projects provide a sense of satisfaction and personalization, purchasing honeycomb shelves is a convenient alternative that still allows you to enjoy the beauty and functionality of this unique storage solution.

Comparison of DIY vs. Store-Bought Honeycomb Shelves
| DIY Honeycomb Shelves | Store-Bought Honeycomb Shelves |
|---|---|
| Opportunity for customization | Ready-made options |
| Requires time and effort for construction | Convenient and hassle-free installation |
| Unique and personalized | Wide variety of styles and finishes |
| May be more cost-effective | Immediate availability |
Inspiration for Shelf DIY Projects
If honeycomb shelves don’t quite match your style, don’t worry! There are plenty of other DIY shelf projects that you can explore and get inspired by. Whether you prefer a more rustic look or a sleek modern design, there is a shelf project out there that will suit your taste and complement your home decor.
Below, we’ve gathered a few ideas to help you find the perfect shelf design for your next project:
1. Floating Rope Shelves
Looking for a unique and nautical-inspired shelving option? Try creating floating rope shelves. Simply attach sturdy brackets to the wall and thread thick, natural rope through the brackets, allowing the rope to hold the wooden shelves in place. This design adds a touch of coastal charm to any space.
2. Vintage Ladder Shelf
If you love the rustic look, repurpose an old wooden ladder into a charming vintage shelf. Simply clean and sand the ladder, then attach wooden planks or salvaged boards to create the shelves. This unique and quirky shelf design is perfect for displaying books, plants, and other decorative items.
3. Geometric Wall Cubes
Add a modern and artistic touch to your walls with geometric wall cubes. Cut wooden boards into different geometric shapes, such as cubes or hexagons, and attach them to the wall in an arrangement that suits your style. These eye-catching shelves can be arranged in a variety of configurations to create a striking focal point in any room.
Remember, the key to a successful DIY shelf project is to choose a design that reflects your personal style and complements your home decor. Get creative, experiment with different materials and finishes, and have fun transforming your space with handmade shelves!
Conclusion
Creating DIY honeycomb shelves is a rewarding project that adds both style and functionality to your living space. With the right tools and materials, you can easily build these unique and eye-catching shelves. Follow the step-by-step instructions in this article to create your own honeycomb shelves and enhance your home decor.
Once you have assembled the hexagons and sanded the edges, it’s time to hang the shelves. Make sure to locate the studs on the wall for stability and use the provided wall brackets. After hanging the shelves, you can personalize them by arranging and styling your favorite decor items. Display books, plants, or other decorative objects to create a visually appealing display.
If the DIY project seems too challenging, don’t worry. There are various options available in stores and from other makers. You can find honeycomb shelves in different styles, from rustic to modern designs, to suit your home aesthetic. Alternatively, if honeycomb shelves are not your style, explore other shelf DIY projects to find the perfect design that complements your home decor.
Get inspired and unleash your creativity with these DIY projects. Enjoy the satisfaction of making something beautiful and practical for your home. With homemade honeycomb shelves, you can have stylish storage that showcases your personal style and enhances the overall look of your living space.
FAQ
Can I use a different type of saw instead of a miter saw?
Yes, you can use a chop saw as an alternative to a miter saw for cutting the fencing planks.
How many pieces of wood do I need for the honeycomb shelves?
You will need a total of 15 pieces of wood to create the honeycomb shelves.
Can I use different materials instead of wood for the shelves?
Yes, you can experiment with different materials, such as metal or acrylic, to create a unique look for your honeycomb shelves.
Do I need to use wall brackets to hang the honeycomb shelves?
Yes, wall brackets are essential for providing stability and support to the shelves.
Is it necessary to sand the edges of the shelves?
Sanding the edges of the shelves is recommended to smooth down any rough edges and create a polished finish.
Can I paint or stain the honeycomb shelves?
Yes, you can paint or stain the shelves to match your home decor or personal preference.
Are honeycomb shelves suitable for displaying heavy objects?
Honeycomb shelves are not designed to hold heavy objects. It is best to use them for lighter decorative items.
Can I hang the honeycomb shelves without locating the studs?
It is highly recommended to locate the studs and screw the wall brackets into them for added stability and security.
How can I personalize the honeycomb shelves?
You can personalize the honeycomb shelves by arranging and styling them with your favorite decor items, such as books, plants, or artworks.
Where can I find pre-made honeycomb shelves?
You can find pre-made honeycomb shelves from various makers and stores. Online platforms like Etsy and Amazon offer a wide range of options.