Are you looking to add a touch of elegance and functionality to your home decor? Look no further than a honeycomb shelf! These hexagon-shaped shelves are not only visually striking but also provide a unique display space for your favorite items. In this step-by-step guide, we will show you how to create your own honeycomb shelf using basic woodworking tools and materials. Whether you’re a seasoned DIY enthusiast or a beginner, this DIY project is perfect for you.
Key Takeaways:
- Create a stylish and functional honeycomb shelf for your home using basic woodworking tools and materials.
- Choose the right materials and tools, such as pine boards, wood glue, nails, and a miter saw.
- Cut the wood into hexagon shapes to assemble the shelves.
- Assemble the hexagons using wood glue and nails, ensuring a proper fit.
- Apply the finishing touches by sanding and painting the shelves to match your home decor.
Materials and Tools Needed
Before you begin building your DIY honeycomb shelf, make sure you have all the necessary materials and tools. Here’s a list of what you’ll need:
- 1x12x96-inch pine board
- Wood glue
- 1-1/4-inch brad nails
- Paint or stain
- Mounting brackets
- Wood screws
- Drill
- Stud finder
- Miter saw
- Tape measure
- Pencil
- Nail gun
- Sander
- Tack cloth
- Paintbrush
These materials and tools are essential for constructing the hexagon-shaped shelves and securely attaching them to the wall. Ensure you have everything ready before you start the project to avoid any delays.
| Materials | Tools |
|---|---|
| 1x12x96-inch pine board | Drill |
| Wood glue | Stud finder |
| 1-1/4-inch brad nails | Miter saw |
| Paint or stain | Tape measure |
| Mounting brackets | Pencil |
| Wood screws | Nail gun |
| Sander | |
| Tack cloth | |
| Paintbrush |
Honeycomb Shelf Materials
The materials needed for your DIY honeycomb shelf include a 1x12x96-inch pine board, wood glue, 1-1/4-inch brad nails, paint or stain, mounting brackets, and wood screws. The pine board will serve as the base for your shelves, while the wood glue and brad nails will hold the pieces together securely. You can choose to paint or stain the shelves to match your home decor. Mounting brackets and wood screws will be used to attach the shelves to the wall.
Honeycomb Shelf Tools
The tools required for building a honeycomb shelf are a drill, stud finder, miter saw, tape measure, pencil, nail gun, sander, tack cloth, and paintbrush. The drill is necessary for creating holes or pilot spots for screws, while the stud finder helps locate wall studs for secure mounting. The miter saw is essential for cutting the pine board at accurate angles, and the tape measure and pencil are used for marking measurements and cuts. The nail gun makes assembly faster and more efficient, while the sander, tack cloth, and paintbrush are utilized during the finishing process.
Cutting the Wood
To begin building your DIY hexagon shelf, you will need to cut your pine board into the required dimensions for the hexagon shelves. This step is crucial to ensure that your shelves fit together seamlessly and create the desired effect.
Start by using a miter saw to trim the ends of the boards at a 30-degree angle. This angle will give the shelves a tapered effect, adding visual interest to your final piece. The number of boards you will need to cut depends on your desired configuration and scale for the honeycomb shelves.
Repeat the cutting process for each hexagon you plan to build, ensuring that the angles are running in opposite directions on the ends. This will create a cohesive look and ensure that the shelves fit together correctly.
Cutting the Wood:
| Materials | Tools |
|---|---|
| – Pine board | – Miter saw |
| – Wood glue | – Tape measure |
| – 1-1/4-inch brad nails | – Pencil |
By following these steps, you will be on your way to creating a beautiful honeycomb floating shelf that adds both style and functionality to your space.
Stay tuned for the next section of our DIY honeycomb shelf series, where we will cover the assembly process in detail.
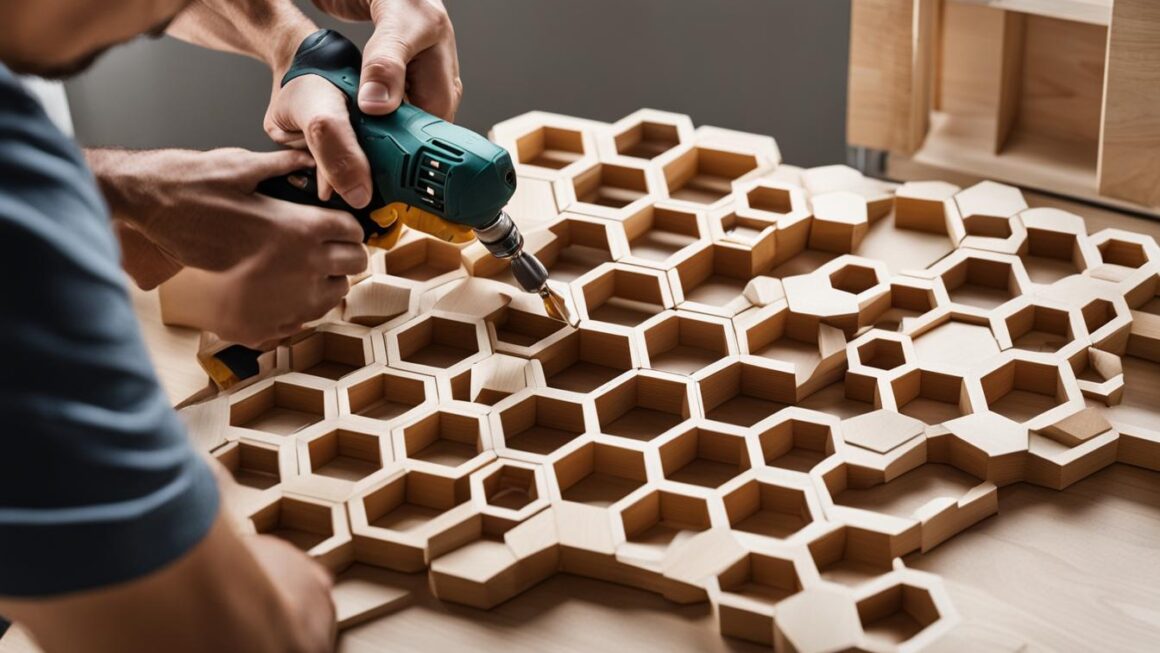
Assembling the Hexagons
Now that you have cut all the boards to size, it’s time to assemble the hexagons for your DIY honeycomb shelf. Start by aligning the edges of the boards and applying wood glue to the joints. Use a nail gun to secure the boards together, ensuring a tight fit. Double-check the measurements and angles to ensure the hexagons are properly aligned.
If you want to create a tapered effect, make sure that the angles on the ends of the boards are running in opposite directions. This will add a unique touch to your honeycomb shelf design. Allow the glue to dry completely before moving on to the next step.
Once the hexagons are assembled and the glue is dry, take a sandpaper and smooth out any rough edges or corners. This will give your honeycomb shelf a polished look. Take your time and make sure to sand evenly across all surfaces.
Example Quote:
“I absolutely love my DIY honeycomb shelf! It adds a modern and stylish touch to my living room. The assembly process was straightforward, and the end result is a functional and eye-catching piece of decor.” – Sarah, DIY enthusiast
Table: Materials and Tools Needed
| Materials | Tools |
|---|---|
| 1x12x96-inch pine board | Miter saw |
| Wood glue | Tape measure |
| 1-1/4-inch brad nails | Nail gun |
| Paint or stain | Sander |
| Mounting brackets | Tack cloth |
| Wood screws | Paintbrush |
| Drill | |
| Stud finder | |
Finishing Touches
After all the hexagons are assembled and dry, it’s time to apply the finishing touches. Use sandpaper to smooth any rough edges or corners. Then, cover your workspace and apply paint or stain to the shelves, following the manufacturer’s instructions. You can get creative with your design by painting the edges a different color or adding decorative touches like gold accents. Once the paint is dry, remove any tape or masking and let the shelves fully cure.
To further enhance the appearance of your homemade honeycomb shelf, consider adding some additional elements:
- Wallpaper: Apply wallpaper to the back of each hexagon for a pop of pattern or color.
- LED Lighting: Attach LED strip lights to the inside edges of the hexagons to create a soft glow.
- Shelf Liners: Cut shelf liners to fit the interior of each hexagon to protect your items and add a touch of style.
“The finishing touches are what truly bring your homemade honeycomb shelf to life. By adding personal touches such as wallpaper, LED lighting, or shelf liners, you can create a unique and visually stunning piece that complements your home decor.” – Home Decor Enthusiast
Table: Options for Finishing Your Honeycomb Shelf
| Finish Option | Description |
|---|---|
| Paint | Apply paint in your desired color to the entire surface of the shelf, or just to the edges for a contrasting effect. |
| Stain | Use wood stain to enhance the natural beauty of the wood grain while still allowing its texture to show through. |
| Decoupage | Decorate the shelf surface with decoupage paper or fabric for a unique and personalized look. |
| Distress | Create a vintage or rustic appearance by distressing the paint or stain with sandpaper or other techniques. |
Experiment with different finishing techniques and materials to achieve the desired look for your homemade honeycomb shelf. Remember to let each layer of paint or stain dry completely before moving on to the next step, and always follow proper safety precautions when working with paints, stains, or other finishing materials.
With the finishing touches complete, your homemade honeycomb shelf is now ready to be mounted and displayed in your home. In the next section, we will cover the process of mounting the shelves securely to the wall.

Mounting the Shelves
Once you have completed assembling your honeycomb shelves, the next step is to mount them securely on the wall. Proper installation ensures stability and safety, allowing you to display your favorite items with confidence. Follow these step-by-step instructions to mount your DIY hexagon bookshelf:
- Decide on the desired placement of your honeycomb shelves and mark the locations where you want them to be installed.
- Attach mounting brackets to the back of each shelf, positioning them in the corners of the top hexagons.
- Use a stud finder to locate wall studs behind the marked locations. It is essential to anchor the shelves to the studs for maximum support.
- If there are no studs available in your desired locations, use drywall anchors and screws to secure the mounting brackets.
- Double-check the levelness of each shelf and adjust if necessary. This will ensure that your shelves are straight and visually appealing.
Remember to follow the instructions provided by the manufacturer for proper installation of the mounting brackets and wall anchors. Take your time during this process to ensure the shelves are securely attached to the wall.
By mounting your honeycomb shelves correctly, you can enjoy the beauty and functionality of your DIY creation for years to come. Whether you use them to showcase books, decor, or other cherished items, these shelves will make a stylish statement in your home.
Additional Tips:
- Use a level to ensure that your shelves are straight before securing them to the wall.
- If you’re unsure about finding wall studs, consult a professional or use alternative anchoring methods, such as drywall anchors or toggle bolts.
- Consider the weight capacity of your shelves and avoid overloading them with heavy objects.
- Regularly check the stability of your mounted shelves and make any necessary adjustments or repairs if needed.
Key Takeaways:
Mounting your DIY hexagon bookshelf involves attaching mounting brackets to the back of each shelf and securing them to wall studs or using appropriate wall anchors. Take the time to ensure each shelf is properly leveled and securely attached for maximum stability and safety.
Introduction to DIY Honeycomb Shelves
D.I.Y. honeycomb shelves have become a popular choice for homeowners looking to add both style and functionality to their living spaces. With their unique hexagon shape, these shelves provide a visually appealing way to display books, decor, or other cherished items. The best part? You can easily create your own honeycomb shelf with a few basic tools and materials.
Building your own honeycomb shelf allows you to unleash your creativity and customize the design to perfectly match your personal style and home decor. Whether you prefer the warmth of wood or the affordability of cardboard, there are options to suit every budget and skill level. Plus, the process is relatively straightforward and can be completed in just a few simple steps.
In this section, we’ll guide you through the basics of creating your own honeycomb shelf. We’ll explore the materials and tools you’ll need, provide step-by-step instructions, and even offer tips for creating a modular honeycomb shelf. So, let’s dive in and discover how you can bring this trendy and functional piece into your home!

Materials and Tools Needed
Before we begin, let’s gather the materials and tools you’ll need to create your DIY honeycomb shelf. Here’s a list of the essentials:
| Materials | Tools |
|---|---|
| 1x12x96-inch pine board | Miter saw |
| Wood glue | Tape measure |
| 1-1/4-inch brad nails | Nail gun |
| Paint or stain | Drill |
| Mounting brackets | Stud finder |
| Wood screws | Sander |
| Paintbrush | Tack cloth |
Step-by-Step Instructions for Cardboard Honeycomb Shelf
If you’re looking for a budget-friendly option to create a honeycomb shelf, you can utilize cardboard to achieve a similar aesthetic. Follow these step-by-step instructions to create your own cardboard honeycomb shelf:
Gather Materials
- Double wall corrugated cardboard sheets
- Normal cardboard
- Glue
- Cutter
- Binder clip
- Masking tape
- Paint
- Spray paint
- Putty filler
- Sandpaper
Cut and Fold the Cardboard
- Use a cutter to cut the double wall corrugated cardboard into hexagon shapes. You can create a template to ensure consistent dimensions.
- Fold the normal cardboard into strips to create planks that will be used to assemble the hexagon shape.
- Glue the planks to the edges of the hexagon-shaped cardboard, creating a sturdy structure.
Assemble and Finish the Shelf
- Secure the cardboard planks with binder clips while the glue dries.
- Fill any gaps or imperfections with putty filler and sand the surface to achieve a smooth finish.
- Apply your desired paint or spray paint to the shelf, allowing it to dry completely.
With these simple steps, you can create a cardboard honeycomb shelf that is not only budget-friendly but also adds a unique touch to your space.
| Advantages of a Cardboard Honeycomb Shelf | |
|---|---|
| Cost-effective | Cardboard is an affordable material, making it a great option for those on a tight budget. |
| Lightweight | Cardboard is lightweight, which makes it easy to hang and move around. |
| Customizable | You can easily customize the appearance of a cardboard honeycomb shelf with paint or spray paint, allowing you to match it to your existing home decor. |
| Eco-friendly | Using cardboard for your honeycomb shelf is a sustainable choice as it is recyclable and biodegradable. |
Whether you opt for a wooden honeycomb shelf or a cardboard version, both options offer a creative and stylish way to showcase your belongings. Choose the method that suits your budget and enjoy the satisfaction of completing a DIY project that enhances your home decor.
Tips for Creating a Modular Honeycomb Shelf
Creating a modular honeycomb shelf allows you to customize and adjust your display according to your preferences. One useful tip is to use binder clips to attach multiple shelves together. Spray painting the binder clips to match the shelf color adds a cohesive look to your design.
By using binder clips, you can easily arrange and rearrange the shelves, creating a versatile and customizable honeycomb shelf. This flexibility allows you to change the configuration whenever you feel like refreshing your home decor or showcasing different items.
To ensure stability and safety, it’s important to secure the shelves to the wall using appropriate hardware. This will prevent any accidental tipping or falling of your honeycomb shelf. Follow the manufacturer’s instructions to properly anchor the shelves and provide a secure attachment to the wall.
Benefits of a Modular Honeycomb Shelf
A modular honeycomb shelf offers several advantages over a traditional fixed design. Here are some benefits to consider:
- Flexibility: With a modular honeycomb shelf, you have the flexibility to arrange and rearrange the shelves as needed. This allows you to adapt the display to suit your changing needs and preferences.
- Customization: By using binder clips to connect the shelves, you can easily create unique configurations and experiment with different layouts. This allows you to showcase your creativity and personalize the look of your honeycomb shelf.
- Portability: The modular nature of this type of shelf makes it easy to disassemble and transport. Whether you’re moving to a new home or simply rearranging your space, a modular honeycomb shelf can be conveniently taken apart and reassembled.
Design Inspiration for Your Honeycomb Shelf
“A honeycomb shelf can be more than just a storage solution; it can be a statement piece that reflects your personal style and enhances the aesthetic of your space.”
When designing your honeycomb shelf, take inspiration from various sources such as interior design magazines, online platforms, or even nature itself. Experiment with different shapes, sizes, and finishes to create a visually captivating focal point in your home.
Consider incorporating elements like natural wood tones, bold colors, or metallic accents to add visual interest and make your honeycomb shelf stand out. Don’t be afraid to mix and match different materials or add decorative touches like plants or artwork to further enhance the overall look.
| Materials | Tools |
|---|---|
| – Pine boards | – Miter saw |
| – Wood glue | – Tape measure |
| – 1-1/4-inch brad nails | – Pencil |
| – Paint or stain | – Nail gun |
| – Mounting brackets | – Sander |
| – Wood screws | – Tack cloth |
| – Drill | – Paintbrush |
| – Stud finder |
Conclusion
Building your own honeycomb shelf can be a fulfilling DIY project that combines style and functionality in your home. Whether you opt for a wooden or cardboard version, following the step-by-step instructions and using the suggested materials and tools will ensure you achieve a successful outcome.
Personalize your honeycomb shelf by selecting paint or stain colors that complement your decor and experiment with different configurations to create a unique display for your treasured items. The modular honeycomb shelf option, using binder clips to connect multiple shelves, offers even greater flexibility for customization.
By creating your own honeycomb shelf, you not only save money, but also have the opportunity to showcase your creativity and design skills. Whether you’re a seasoned DIY enthusiast or a beginner, this project is accessible and rewarding for all skill levels. So why not embark on this exciting journey and add a touch of charm to your living space with a homemade honeycomb shelf?
FAQ
What materials and tools do I need to create a honeycomb shelf?
To create a honeycomb shelf, you will need the following materials and tools: 1x12x96-inch pine board, wood glue, 1-1/4-inch brad nails, paint or stain, mounting brackets, wood screws, drill, stud finder, miter saw, tape measure, pencil, nail gun, sander, tack cloth, and paintbrush.
How do I cut the wood for a honeycomb shelf?
Start by cutting your pine board into the required dimensions for the hexagon shelves. This involves using a miter saw to trim the ends of the boards at a 30-degree angle. The number of boards needed will depend on your desired configuration and scale for the honeycomb shelves.
How do I assemble the hexagons for a honeycomb shelf?
After cutting the boards, assemble the hexagons by gluing and nailing the pieces together. Secure the joints with wood glue and use a nail gun to attach the boards. Repeat this process for additional hexagons, adjusting the configuration as desired.
What are the finishing touches for a honeycomb shelf?
After assembling the hexagons, use sandpaper to smooth any rough edges or corners. Then, apply paint or stain to the shelves following the manufacturer’s instructions. You can get creative with your design by adding decorative touches like different colored edges or gold accents.
How do I mount the honeycomb shelves?
To mount the honeycomb shelves, attach mounting brackets to the back of each shelf. Position the brackets in the corners of the top hexagons. Use a stud finder to locate wall studs and anchor the shelves securely. If there are no studs available, use drywall and stud anchors for stability.
Can I create a honeycomb shelf using cardboard?
Yes, if you prefer a more budget-friendly option, you can create a honeycomb shelf using cardboard. You will need double wall corrugated cardboard sheets, normal cardboard, glue, cutter, binder clip, masking tape, paint, spray paint, putty filler, and sandpaper. Cut and fold the cardboard according to the provided template, then glue and assemble the cardboard planks to create the hexagon shape. Finish by filling, sanding, and painting the shelf.
How can I create a modular honeycomb shelf?
To create a modular honeycomb shelf, use binder clips to attach multiple shelves together. Spray paint the binder clips to match the shelf color and use them to hold the shelves in place. This allows you to easily arrange and rearrange the shelves to your liking.