Welcome to our beginner’s guide on how to render beeswax! If you’ve ever wondered about the process of transforming beeswax into a usable form, you’ve come to the right place. In this guide, we will walk you through the steps of rendering beeswax, providing you with all the information you need to get started with this rewarding DIY project.
Key Takeaways:
- Rendering beeswax is a simple process that can be done at home with minimal equipment.
- You will need wax cappings, old honeycomb or scrapings, two plastic 4 litre ice cream containers, fine straining cloth, clothes pegs, and a microwave oven for the rendering process.
- Rendering beeswax at home offers advantages such as reducing the chances of reaching the flash point and saving the honey.
- Traditional methods of rendering on a stove and the microwave method both have their advantages depending on the quantity of beeswax you have.
- The process involves melting the wax in a microwave-safe container, straining it to remove impurities, and allowing it to harden.
What You Will Need for Rendering Beeswax
Before you start rendering beeswax at home, it’s important to gather all the necessary materials. Here’s a list of items you’ll need to ensure a smooth and successful beeswax melting and filtering process:
- Wax cappings, old honeycomb or scrapings
- Two plastic 4-litre ice cream containers
- About 50cm of fine straining cloth
- Approximately 10 clothes pegs
- A microwave oven
These materials are easily accessible and affordable, making beeswax rendering accessible to anyone interested in DIY projects with beeswax. Whether you have your own beehive or have access to beeswax scraps, you can easily gather these materials to get started.
It’s worth noting that the use of disposable ice cream containers makes the process cost-effective and convenient for future rendering processes. The fine straining cloth ensures that any impurities are filtered out, resulting in pure beeswax for various applications.
| Materials | Quantity |
|---|---|
| Wax cappings, old honeycomb or scrapings | Enough to fill one ice cream container |
| Plastic 4-litre ice cream containers | 2 |
| Fine straining cloth | About 50cm |
| Clothes pegs | About 10 |
| Microwave oven | 1 |
By ensuring you have all the necessary materials ready, you can proceed with the beeswax rendering process smoothly without any interruptions.
Advantages of Rendering Beeswax at Home
Rendering beeswax at home offers numerous advantages. Not only is it a cost-effective and accessible process, but it also allows for greater control over the purity and quality of the final product. By following DIY beeswax rendering techniques, you can ensure that the beeswax you obtain is free from impurities and suitable for various applications.
One of the key advantages of rendering beeswax at home is the ability to reduce the chances of reaching the flash point. When using a microwave for the rendering process, the wax can be melted in short intervals, minimizing the risk of overheating and potential hazards. This makes the home rendering method safer, especially for beginners who may not have extensive experience with handling beeswax.
Another advantage is the ability to save honey during the rendering process. By using only beeswax scraps in the container, there is no need to add water or waste any honey. This not only helps minimize waste but also maximizes the yield of both honey and beeswax from the hive. It’s a more economical and efficient way of processing these natural resources.
Table: Advantages of Rendering Beeswax at Home
| Advantages | Description |
|---|---|
| Control over purity | Rendering beeswax at home allows for greater control over the quality and purity of the final product. |
| Reduced risk of overheating | The use of a microwave for rendering beeswax minimizes the risk of reaching the flash point. |
| Saving honey | By using only beeswax scraps, the home rendering method avoids the need to add water and waste honey. |
In addition to the advantages mentioned above, rendering beeswax at home using disposable ice cream containers is a cost-effective and convenient option. These containers are readily available and can be reused for future rendering processes. It eliminates the need for specialized equipment or expensive utensils, making DIY beeswax rendering accessible to anyone interested in harnessing the benefits of beeswax.
With the advantages of home rendering, it’s no wonder that more and more people are embracing the DIY approach for beeswax processing. Not only does it provide a sense of satisfaction and fulfillment, but it also allows individuals to fully appreciate the natural beauty and versatility of beeswax in their own projects and creations.
Traditional vs. Microwave Beeswax Rendering Methods
When it comes to rendering beeswax, there are two main methods that beekeepers can choose from: traditional stove top methods and the more modern microwave method. Each method has its own advantages and considerations, allowing beekeepers to select the one that best suits their needs and available resources.
Traditional Beeswax Rendering
Traditional beeswax rendering methods involve melting beeswax on a stove top using a double boiler or a dedicated beeswax rendering pot. This method is ideal for beekeepers with larger quantities of beeswax to render, such as those who have accumulated buckets of beeswax scraps over time.
One of the advantages of the traditional method is that it allows for the production of larger blocks of wax. This can be beneficial for those who require larger quantities of beeswax for their projects, such as candle making or soap making. Additionally, the traditional method provides more control over the melting process, allowing beekeepers to monitor the wax closely and ensure that it reaches the desired consistency.
Microwave Beeswax Rendering
The microwave beeswax rendering method offers a more convenient and time-saving alternative for beekeepers with smaller quantities of beeswax. This method involves placing the beeswax scraps in a microwave-safe container and melting them in short intervals, stirring in between to ensure even melting.
One of the advantages of the microwave method is its simplicity and ease of use. It requires minimal equipment and can be done quickly, making it a suitable option for beekeepers who are new to rendering beeswax or who have limited time and resources. The microwave method is also less likely to reach the flash point, as the wax is melted in shorter intervals, reducing the risk of accidents or damage.
| Traditional Beeswax Rendering | Microwave Beeswax Rendering |
|---|---|
| Requires a stove top and a double boiler or dedicated pot | Requires a microwave and a microwave-safe container |
| Produces larger blocks of wax | Suitable for smaller quantities of beeswax |
| Offers more control over the melting process | Offers simplicity and ease of use |
| Ideal for beekeepers with buckets of beeswax scraps | Suitable for beekeepers with limited quantities of beeswax |
Overall, the choice between traditional and microwave beeswax rendering methods depends on factors such as the amount of beeswax to be rendered, the available resources, and the beekeeper’s specific needs and preferences. Both methods can yield high-quality beeswax for various projects, allowing beekeepers to make the most of their precious wax resources.
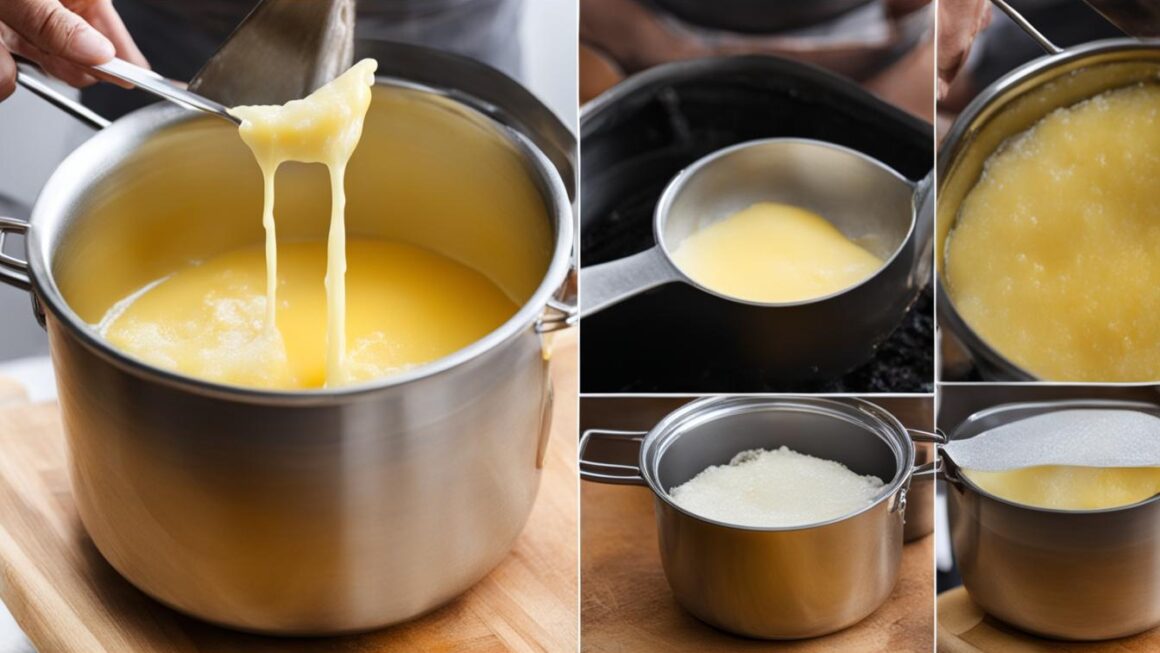
Step-by-Step Process of Melting the Wax
Once you have gathered all the necessary materials and equipment for rendering beeswax, the first step is to melt the wax. This process can be easily done in a microwave oven, making it convenient and efficient for beginners. Follow the step-by-step guide below to safely melt your beeswax:
Step 1: Prepare the Beeswax Scraps
Collect the beeswax scraps, wax cappings, or old honeycomb that you will be using for rendering. Ensure that the scraps are clean and free from any debris. If necessary, remove any impurities or hardened honey from the wax scraps.
Step 2: Place the Beeswax in a Microwave-Safe Container
Take a microwave-safe container, preferably a plastic 4 litre ice cream container, and fill it with the beeswax scraps. Make sure not to overfill the container, leaving enough space for the wax to melt and expand.
Step 3: Microwave the Beeswax in Intervals
Place the container with the beeswax in the microwave oven and heat it on a low power setting. Start by microwaving the wax for 1 minute intervals and stirring in between. This process helps to evenly distribute the heat and prevent overheating. Repeat the intervals until the wax is completely melted.
It is important to monitor the wax closely during the microwaving process to avoid overheating, as beeswax is flammable. If you notice any smoke or strong odors coming from the microwave, stop the process immediately and let the wax cool down before continuing.
| Step | Description |
|---|---|
| 1 | Prepare the Beeswax Scraps |
| 2 | Place the Beeswax in a Microwave-Safe Container |
| 3 | Microwave the Beeswax in Intervals |
Now that you have successfully melted the beeswax, you can proceed to the next step of the rendering process: straining the wax to remove any impurities.
Straining Wax To Remove Impurities
After the wax has been melted, it is important to strain it to remove any impurities. Straining beeswax ensures that only pure wax is collected, free from debris or contaminants. To strain the melted beeswax, you will need a mesh strainer or cheesecloth and another clean container to collect the strained wax.
Start by placing the strainer or cheesecloth over the opening of the clean container. Slowly pour the melted beeswax through the strainer, allowing it to pass through the mesh or cloth while trapping any impurities. You may need to use a spoon or spatula to gently stir the wax as it strains to help it pass through the filter.
The straining process may take some time, especially if the melted wax contains a significant amount of debris. Be patient and allow the wax to strain naturally. Once the wax has passed through the strainer and the impurities have been removed, you will be left with clean, pure beeswax ready for further use.
Straining the wax to remove impurities is an essential step in the beeswax rendering process. By ensuring that the wax is free from debris, you can achieve higher quality results in your DIY projects. Whether you’re making candles, lip balms, or other beeswax-based products, straining the wax will contribute to a smoother and more refined final product.

Letting the Wax Harden
Once the beeswax has been strained to remove impurities, it needs to be allowed to harden. This is an essential step in the beeswax rendering process as it ensures that the wax solidifies and becomes usable for various applications. Let’s take a closer look at how to let the wax harden effectively.
After straining the melted beeswax, transfer it to a clean container or mold. It is important to use a container or mold that is suitable for handling melted wax and has enough space to accommodate the wax as it hardens. Silicone molds are a popular choice as they are flexible and make it easy to remove the hardened wax.
Once the wax is in the container or mold, allow it to cool and solidify at room temperature. The amount of time required for the wax to harden will depend on the temperature of your surroundings. It is recommended to leave the wax undisturbed for at least a few hours or overnight to ensure complete solidification.
Once the beeswax has hardened, carefully remove it from the container or mold. You can gently push the edges of a silicone mold to release the wax or use a knife to loosen it from a container. The hardened beeswax is now ready to be used for a variety of DIY projects and applications.
What to Do With Rendered Beeswax
Once you’ve successfully rendered beeswax at home, you’ll have a versatile material that can be used for a wide range of DIY projects. From candles to skincare products, the uses and applications of beeswax are endless. Here are some ideas to inspire your creativity:
- Candle Making: Beeswax candles are known for their natural beauty and clean burn. You can create your own customized candles by melting the rendered beeswax and pouring it into candle molds or containers. Add essential oils or dried flowers for a unique touch.
- Lip Balm: Beeswax is a common ingredient in lip balms due to its moisturizing and protective properties. Combine the rendered beeswax with nourishing oils and flavors to make your own all-natural lip balm.
- Soap Making: Beeswax adds hardness and texture to homemade soaps. Use it in combination with other oils and lye to create luxurious and gentle bars of soap.
- Furniture Polish: Mix melted beeswax with olive oil or another natural oil to create a nourishing and protective polish for wooden furniture. Apply a thin layer and buff for a beautiful shine.
- Lotion Bars: Lotion bars are solid moisturizers that melt upon contact with the skin. Beeswax acts as a natural emulsifier, allowing the bar to glide smoothly. Combine beeswax with rich oils and butters to create your own soothing lotion bars.
- Sealant for Stone Countertops: Beeswax can also be used to seal and protect stone countertops, such as granite or marble. Apply a thin layer of melted beeswax, allow it to dry, and then buff for a natural and food-safe finish.
These are just a few examples of the many DIY projects you can undertake with rendered beeswax. The internet is a treasure trove of detailed instructions and creative ideas for utilizing this natural material in various ways. Explore, experiment, and enjoy the endless possibilities that beeswax offers!

Safety Precautions and Tips for Rendering Beeswax
Rendering beeswax at home can be a rewarding experience, but it’s essential to prioritize safety throughout the process. By following some simple precautions, you can minimize the risk of accidents and ensure a smooth and successful beeswax rendering process.
First and foremost, never leave the wax unattended while melting. Beeswax is flammable and can easily catch fire if overheated. It is best to use an electric heating element, such as a microwave, instead of an open flame to reduce the risk of accidents.
It is also important to designate specific equipment for beeswax rendering. Using dedicated containers and utensils ensures that beeswax does not mix with other substances, such as food or chemicals. Additionally, avoid pouring melted wax or wax water down the drain as it can cause clogging. Instead, dispose of the wax responsibly by allowing it to solidify and then discarding it in the trash.
When working with beeswax, it’s recommended to wear protective gear such as gloves and an apron to prevent any accidental spills or burns. Beeswax can reach high temperatures when melted, so it’s crucial to handle it with caution. If you accidentally come into contact with hot wax, immediately rinse the affected area with cool water.
Key Safety Precautions for Beeswax Rendering:
- Never leave the wax unattended while melting.
- Use an electric heating element instead of an open flame.
- Designate specific equipment for beeswax rendering.
- Dispose of wax properly, avoiding the drain.
- Wear protective gear, such as gloves and an apron.
- Handle hot wax with caution and rinse any accidental contact with cool water.
Quote:
“Safety should always be a top priority when rendering beeswax at home. By following the necessary precautions and taking the time to create a safe working environment, you can enjoy the process and reap the benefits of your homemade beeswax creations.” – Beeswax Enthusiast
By implementing these safety precautions and tips, you can ensure a safe and enjoyable beeswax rendering experience. Remember to carefully follow the steps outlined in this guide and always prioritize your well-being while working with beeswax.
Now that you have a good understanding of the safety precautions involved in rendering beeswax, let’s move on to the final section of this beginner’s guide, where we’ll provide a summary of the entire process and offer some closing thoughts.
Conclusion
In conclusion, rendering beeswax is a simple and rewarding process that can be easily done at home with minimal equipment. By following the step-by-step guide provided, you can successfully render beeswax and explore the numerous uses and applications of this versatile material.
Throughout the rendering process, it is important to prioritize safety and take necessary precautions to prevent accidents or damage. Remember to never leave the wax unattended while melting and to use an electric heating element instead of an open flame. Additionally, designate specific equipment for beeswax rendering and avoid pouring wax or wax water down the drain to prevent clogging.
Once the beeswax has been rendered and strained, it can be allowed to cool and solidify, ready to be used for various DIY projects. From candles to skincare products, the uses for beeswax are endless. Let your creativity shine by exploring the many resources available that provide detailed instructions for different beeswax projects.
Start your beeswax rendering journey today and embrace the natural beauty and versatility of this incredible material. Whether you’re a beginner or an experienced DIY enthusiast, rendering beeswax at home is a satisfying and enjoyable process that allows you to create unique and eco-friendly products.
FAQ
What equipment do I need for rendering beeswax?
You will need wax cappings, old honeycomb or scrapings, two plastic 4 litre ice cream containers, about 50cm fine straining cloth, about 10 clothes pegs, and a microwave oven.
What are the advantages of rendering beeswax at home?
Rendering beeswax at home reduces the chances of reaching the flash point, allows you to save the honey, and is cost-effective and convenient for future rendering processes.
What is the difference between traditional and microwave beeswax rendering methods?
Traditional methods produce bigger blocks of wax and are suitable for larger quantities of beeswax, while the microwave method is ideal for smaller amounts of beeswax.
How do I melt beeswax?
To melt beeswax, put the beeswax scraps in a microwave-safe container, heat in the microwave at 1-minute intervals, and stir in between to ensure even melting.
How do I strain beeswax to remove impurities?
You can strain beeswax by pouring the melted wax through a filtering material, such as a mesh strainer or cheesecloth, into another container.
How do I let the wax harden?
Let the melted beeswax sit undisturbed until it cools and solidifies. It will then harden and can be easily removed from the container.
What can I do with rendered beeswax?
Rendered beeswax can be used for making candles, lip balm, soap, furniture polish, lotion, and as a sealant for stone countertops, among many other applications.
What safety precautions should I take when rendering beeswax?
Never leave the wax unattended while melting, use an electric heating element instead of an open flame, designate specific equipment for beeswax rendering, and avoid pouring wax or wax water down the drain.